This Article Will Solve 80% of Your CSS Problems ('Cascading' Explained)
Let's master this fundamental CSS feature and learn how it really works

You're trying hard to get your CSS right:
- You're changing selectors.
- You're adding
!importantto the end of each declaration. - You're putting IDs everywhere.
- You're moving declarations down and up, trying hard to get things organized.
And yet, nothing seems to make sense.
Some styles are applied, others aren't, and you can't figure out why.
All that hair-pulling could be a thing of the past if you spent 10 minutes really getting into what 'Cascading' actually means.
CSS stands for Cascading Style Sheet. Cascading is the first word of the acronym, yet it is one of the most overlooked and misunderstood feature of the styling language.
In this article, I'll teach you what cascading is, and how to predict CSS behavior so that you'll never run into such a problem again.
What is the cascade?
Look at this basic HTML header:
<header class="header">
  <h1 id="website-title" class="title">My Website</h1>
  <nav>
    <ul id="main-nav" class="nav">
      <li><a href="/">Home</a></li>
      <li><a href="/bikes">Bikes</a></li>
      <li><a href="/scooters">Scooters</a></li>
      <li><a href="/contact" class="featured">Book a call</a></li>
    </ul>
  </nav>
</header>
Now of course I'll want to style this header and navigation.
It might seem like an easy task because this is a very basic example. But when projects grow, things are going very complex much quicker than you think.
What if things did get very complex, and you happen to inadvertently provide conflicting declarations to the browser?
h1 {
  font-family: serif;
}

#website-title {
  font-family: sans-serif;
}

.title {
  font-family: monospace;
}
These 3 rulesets attempt to set a different font family to the heading.
This conflict will have to be solved.
The good news is that the result of this battle is predictable. And you should be able to do that, so that writing CSS doesn't look like gambling anyone.
The browser follows a set of rules to determine the winner (called the cascaded value), and this set of rules is exactly what is called the cascade.
The set of rules to follow when a conflict between selectors arises is what's called the cascade.
But how do you predict the result then? What's this set of rules made of?
The three rules that solve every conflict
When a conflict arises, the cascade looks at these three things:
- Stylesheet origin (where the styles come from)
- Selector specificity (which selectors are more specific)
- Source order (which declaration is declared where)
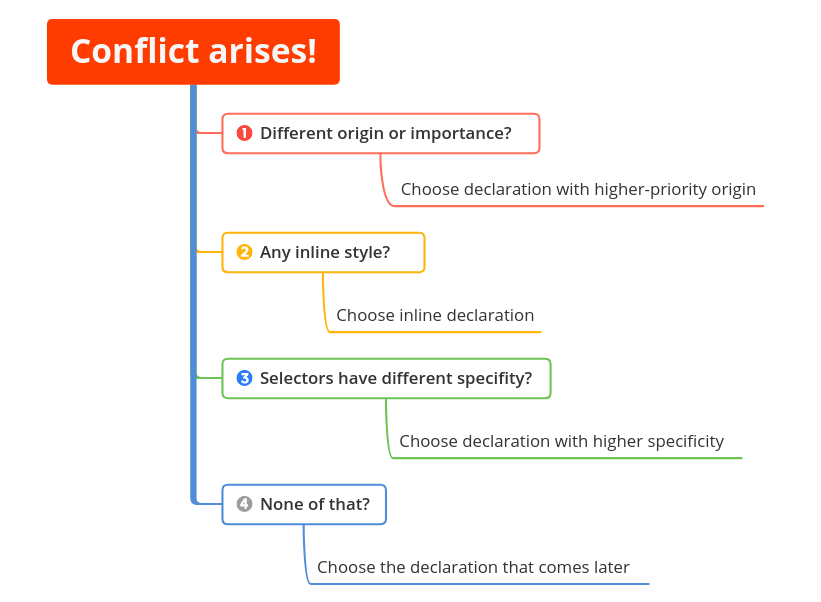
Stylesheet origin
Stylesheet origin refers to where the styles come from. Did you set this declaration yourself or was it the browser?
Yes, the browser applies default styles. These are the style you usually reset when first creating your CSS stylesheet.
For example, here are a few styles the browser applies to your page:
- headings and paragraphs are given a top and bottom margin
- links are underlined and given a blue color
- lists are given a
list-style-typeofdisc, top and bottom margins, and a left padding
These styles are called user agent styles. They have low priority, meaning your styles will always override them.
Stylesheet origin is the first thing the cascade looks at. Is the declaration coming from the author? If yes, override the browser's default.
One thing to remember, though: declarations that are marked as !important will always come first and override even your own rules.
Once the origin is determined, the selector specificity comes next.
Selector specificity
Selectors that are more specific come before those with lower specificity.
This is often a missed concept, yet one of the most important.
Inline styles always override declarations applied from your stylesheet.
Then come IDs, classes and tags. Here are the rules:
- The selector with the most IDs wins
- If that results in a tie, the selector with the most classes wins
- If that results in a tie, the selector with the most tag names wins
Consider these selectors again:
h1 {
  font-family: serif;
}

#website-title {
  font-family: sans-serif;
}

.title {
  font-family: monospace;
}
Now it becomes obvious who wins and becomes the cascaded value: the ID selector (#website-title) wins hands down and the sans-serif font family will be applied to our page.
You can confirm that by inspecting the title with the dev tools:
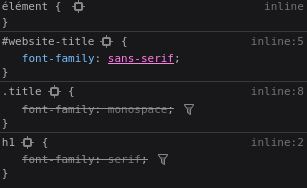

But what if it has many tags or classes? Well, that's not much harder to figure out.
html body header h1 {
  color: red;
}

body header.header h1 {
  color: blue;
}

.header .title {
  color: orange;
}

#website-title {
  color: green;
}
Here, the title will be green because it has an ID selector, which has the higher specificity.
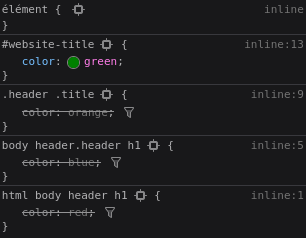

The next specific is the one that has the most classes, so that's the one with two classes: orange.
Then comes the one with one class (blue), and finally the one with only tags.
Easy, right?
One thing I love is how we can give numbers to selectors to quickly visualize who wins the battle.
Here is how we use specificity notation:
- 1st number: IDs
- 2nd number: classes
- 3rd number: tags
// 0, 0, 4 (four tags)
html body header h1 {
  color: red;
}

// 0, 1, 3 (one class and three tags)
body header.header h1 {
  color: blue;
}

// 0, 2, 0 (two classes)
.header .title {
  color: orange;
}

// 1, 0, 0 (one ID)
#website-title {
  color: green;
}
This way you can compare selectors easily:
- 1, 0, 0 wins over 0, 2, 0 (1 ID > 2 classes)
- 0, 2, 0 wins over 0, 1, 3 (2 classes > 1 class and 3 tags)
- 0, 1, 3 wins over 0, 0, 4 (1 class and 3 tags > 4 tags)
Now what happens if a 0, 1, 3 selector conflicts with another 0, 1, 3 selector?
This is where source order enters the show.
Source order
Source order refers to which declaration is declared later in the stylesheet.
This part is the easiest. If the origin and specificity are the same, then the declaration chosen is the one that appears later in the page.
#main-nav {
  margin-top: 10px;
  list-style: none;
  padding-left: 0;
}

#main-nav li {
  display: inline-block;
}

.nav a {
  color: white;
  background-color: black;
  padding: 5px;
  border-radius: 2px;
  text-decoration: none;
}

a.featured {
  background-color: orange;
}
Here, the two link selectors (.nav a and a.featured) are equally specific.
What about the source order? background-color: orange comes after background-color: blue. It wins the battle.
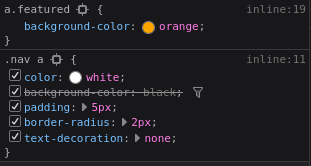

Source order determines the background color of this navigation element: it appears orange, and we get our feature button exactly as we wanted.
Let's recap
When a conflict arises, the following determines the priorities and styles that will be applied:
- If the styles come from you, they take priority
- Else, if selectors are more specific, they take priority
- Else, if a style is declared later, it takes priority
These three steps are called stylesheet origin, selector specificity, and source order.
As a rule of thumb, you want to keep your selectors specificity low. It will be much easier to override something when needed. This is also the reason why you should use !important only rarely.
One last thing
I plan on publishing many similar articles on Hashnode in the future. If you liked this article, consider ✅ following this blog (back to the top right corner) so you don't miss any!
It really gives me superpowers and makes me want to write even more.
Also check out 🐦 my Twitter, where I write daily on web development.


